The steering box was installed in the truck with new bolts and they were torqued to the proper setting. The pitman arm and drag link were installed, torqued and the cotter pins were installed and then.....
A New Old Stock (NOS) steering shaft assembly was listed on eBay!
 The above photo is from the eBay listing.
Always looking for ways to improve the truck prompted me to bid. I was the winning bidder using my sniping software and now it was time to remove the steering box, the one that was already installed! So out came the steering box and it was disassembled...again.
The new steering shaft arrived and the grease was so old that the worm would not turn. It was totally frozen. I submerged the assembly in mineral spirits for a couple days and eventually I got it apart.
There was still some dried grease that had to be removed so out came the Dremel with a brass brush to clean the gears and ball returns.
Some of the photos in this entry are in grayscale instead of color. I had the camera on the wrong white balance setting and no amount of color correction would work.
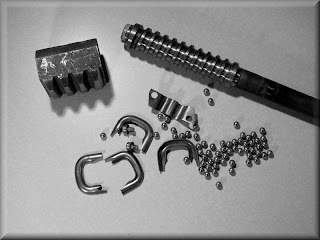
The photo below shows all of the components, steering shaft, ball nut, return guides, clamp, screws and balls cleaned and ready to go....

This is a job that anyone can do! I never went this deep into a steering box before but it really is quite simple and definitely not "brain surgery!"
After putting the ball nut on the steering shaft it is necessary to install the balls, all 62 of them. There are two circuits of 31 balls each so they have to be carefully counted and divided. 20 balls are dropped into one hole of the ball nut. The shaft is slowly turned as the balls are dropped into the hole until 20 balls are swallowed up.
 There are two ball return guides that consist of two halves. Refer to the first photo which shows all of the components.
The remaining 11 balls for the first circuit are put into a return guide half section using grease to hold them in place.
The other half section of a ball return guide is placed over the balls in the grease-filled half. The assembled ball return guide is then placed into the guide holes of the ball nut.
The second circuit is filled using the same method as the first circuit. When all of the balls are installed, the second ball return guide is filled with the remaining balls and installed.

The ball return guide clamp is placed over the ball returns and the two screws are installed. Now that you see how easy the job is I am sure that anyone can do it. It just takes some patience.
If you ever attempt to go this deep into a steering box, I recommend that you have lots of paper towels and rags to clean the greasy mess. Make sure that you have a half sheet baking pan or something similar to catch all of the small parts. Don't lose any of the balls!

In the above photo you can see what a brand new gear looks like. There is no gauling on the teeth. Usually, gauling on these teeth indicate that the sector gear was over tightened to remove free play.
I reassembled the steering box using Green Grease and another new sector shaft seal. I installed the steering box (photo below) and reinstalled the pitman arm and drag link.
Wow! What a difference! There is no free play at all now. There are no tight spots going from full left to full right. This truck is going to drive like new!

Be sure to vote in the poll that relates to this Steering Box story.
As always, there are larger versions of these photos at my Flickr site in the "Steering Box" Set. Just make sure you use your browser's "Back" button to return to this page. I don't want you getting lost in cyberspace!


No comments:
Post a Comment